User Guide to Trainspotting with Anderl
Trainspotting (noun) /ˈtreɪnspɒtɪŋ/
- The act of watching trains, often with the aim of noting down the number of each railway engine.
With Trainspotting with Anderl you can watch the trains in various railway settings. However there is no requirement that you note the number of each railway engine, although please do if you feel the need!
Before describing how to use the app, it would be helpful to explain a couple of terms that are frequently used:
- Station Timetable - in real life a station timetable should reflect when trains arrive or leave a station. In Trainspotting with Anderl, a station timetable defines when and how the trains will move across the screen to create the railway scene.
- Playlist - in programs such as Apple's iTunes® there are playlists that define a number of songs that are to be played. In Trainspotting with Anderl there are also playlists but these define which station timetables are to be shown. And just like in iTunes, the contents of the Trainspotting with Anderl playlist can be played sequentially or at random!
Also it is important to know that the downloaded app has 2 features disabled:
- the user cannot change the playlist
- the user cannot import other playlists and station timetables.
By purchasing the upgrade (see Upgrade below) these features will be enabled.
Running the Trainspotting with Anderl app
After installation, simply click or touch the Trainspotting with Anderl icon. The introductory screen will appear for a couple of seconds. Then the app will start displaying the station timetables that are in the default playlist.
Configuration
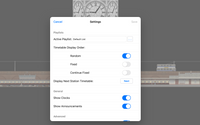
The Trainspotting with Anderl app has various user preferences that can influence how it operates. These are all contained in the Settings page, which can be activated by tapping on the Settings icon in the top-right corner of the Trainspotting screen.
Playlists:
- Active Playlist
Playlists consist of one or more station timetables that will be 'played' one after the other by the Trainspotting with Anderl app. Once all timetables have been played, the program will start from the beginning of the list again.
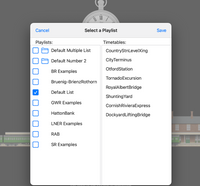
(Only available in the full version) By clicking on the browse button, the user will see a list of available playlists on the left side of the window. The currently selected playlist will be marked with a blue checkbox icon. On the right hand side the station timetables that are contained in the selected playlist are listed.
When a new playlist has been selected, activate the 'Save' button to confirm the change in playlist. The app will then start playing the new list of station timetables once the Settings window has been closed.
- Timetable Display Order
This defines how the program will select the timetables in the playlist to be played:
- Random - the timetables will be selected at random.
- Fixed - the timetables will be played as they are listed in the playlist.
- Continue Fixed - when Trainspotting with Anderl appears again after it has been interrupted (for example by opening another app) then the previous timetable will be restarted, rather than starting from the beginning of the playlist again.
- Display Next Station Timetable
Activating this button will cause the program to stop displaying the current station timetable and move to the next timetable in the playlist.
General:
- Show Clocks
Some station timetables display a clock in the top centre of the screen. If this is not wanted, disabling this setting will hide the future display of any clock.
- Show Announcements
Some station timetables display 'announcements' at the bottom centre of the screen which provide further information about the actions occuring on the screen. If these announcements are not wanted, disabling this setting will hide the future display of any text.
- Set Background Colour
The default colour of the background for all station timetables is black but the user can change the background colour at any time. The user can select another colour by tapping the colour button and selecting a new background colour from the colour grid.
Import:
- Import Playlists, Timetables and Libraries
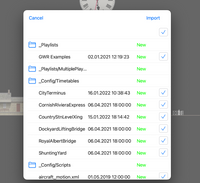
(Only available in the full version) The Trainspotting with Anderl app has been designed to be expandable. It is possible to import data provided by 3rd-parties simply by selecting a *.zip file in the Download page.
The contents of the zip file are then displayed in a new window. Select the files that are to be imported and then activate the Import button to store the data in the program.
Once the data is imported, you can select the new Playlist in the Active Playlist near the top of the Settings window.
The 3rd-party data files are created by the Station Manager program. This will soon be availble on the App Store to help users create and edit their own playlists, station timetables and image libraries.
Help:
- Trainspotting Help
Activating this link will open this web page in the browser.
- Anderl Software Home Page
Activating this link will open the home page of this website.
Advanced:
- Log Messages
Turning this setting on will cause various messages to be written to a log file as the program executes. The writing of log messages to a file can be very helpful when there are problems with how the program is running. By default this setting is off, since the writing of messages can affect program performance, and file sizes can get very large. See Support for more information
- View/Share the log file
View the messages in the log file. It possible to share/save the file using the Share button. See Support for more information.
Reset:
- Reset all settings and data
Deletes the current playlists, station timetables and libraries and re-installs the original data provided during installation of Trainspotting with Anderl.
Note: This should only be used when some error has occured in the running of the program and all other attempts to correct the problem have failed.
Warning! - Any 3rd-party data will also be removed, and will have to be re-installed by the user.
Upgrade:
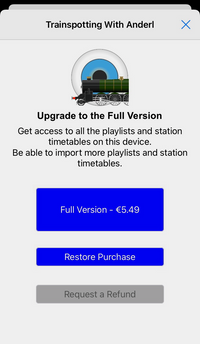
- Upgrade to full version
Allows the user to buy the upgrade to the full version from Apple's App Store.
If the app is deleted and then re-installed, or if the app is installed on another device owned by the user, then the 'Restore Purchase' button should be pressed to apply the upgrade (at no extra cost).


